RSS

SOUP TIME!!!! (finally…)

I live in Texas. Except for the August heat, I love the weather here. After months of HOT, we get a month or two of cold weather, maybe 2 snow days, although Texas Snow is really sleet, hail and flurries that turn to road hazards the moment they hit the ground.

baby its cold outside

I look forward to the cold months for a couple of reasons:

  1. I get to warm my icy feet on my dear husband’s legs and make him curse me every single night (MUAHAHAHA),
  2. I can go for months without worrying about my toenails being presentable,
  3. There is the possibility of going on a ski trip (YAY!),
  4. And it’s not unbearably hot when I use the stove and oven to cook or bake!

The hubs pretends to HATE #1, but I am really doing him a favor since he’s always hot and I’m always cold – it evens it out! #4 means that it’s time to make hot things – like snickerdoodles, kartoffelsuppe, cakes, and kale soup.

Since I have been lax in posting, this will be a two-fer. Just for you!

The soup making began with a request for something with kale.

DSCF1048

I like kale, but I never know what to do with it besides kale chips, and anytime I don’t know what to do with a vegetable, soup is usually the fallback. So I decided to make a kale soup. I added sausage to it, and it actually turned out kind of like the Zuppa Toscana at Olive Garden, only better.

Yummy soup in my favorite bowls

Yummy soup in my favorite bowls

The next soup-making quest began with a craving for german food. We eat at Everything German in Bedford fairly often, and I LOVE their kartoffelsuppe (german potato soup). We eat out way too much, so in an effort to cut back on our food costs, I decided to take a crack at making it myself. It was a smashing success, if I do say so myself.

New wine was on sale - so I bought a red and a white, we drank both bottles that night. ;-)

New wine was on sale – so I bought a red and a white, we drank both bottles that night. 😉

As with any meal, the animals in our lives benefit as well:

Carrot Peels = happy chickens (and darker yolks!)

Carrot Peels = happy chickens (and darker yolks!)

Kale ribs = happy bunnies

Kale ribs = happy bunnies

Kale/Sausage Soup

What You Need

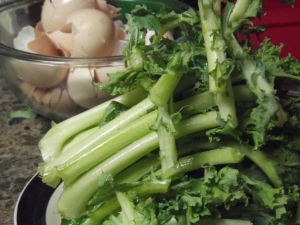
  • 2 bunches Kale, torn into bite-sized pieces (I give the ribs to the bunnies)
  • 5 medium Carrots, sliced
  • 12 whole Red Potatoes, slided (I used a mandolin slicer)
  • 1 whole Onion, diced
  • 1 pound Italian Sausage
  • 1 teaspoon Red Pepper Flakes
  • 2 cups Low Sodium Chicken Broth
  • 4 cups Half-and-half (optional)
  • Oregano
  • Black Pepper

What to Do With All That

  1. In a medium pot, boil sliced potatoes and carrots until tender. Drain and set aside.
  2. In a large soup pot, crumble and brown the Italian sausage. Drain as much as the fat as you can. Stir in the red pepper flakes, oregano, chicken broth and half-and-half (if desires, if not, replace with water).
  3. Simmer for 30 minutes.
  4. Give it a taste and adjust seasonings as needed.
  5. Add the potatoes, then stir in the kale. Simmer an additional 10-15 minutes, then serve.
  6. If one of you wants creamy soup and one doesn’t, splash some half and half into your bowl at the end. I like it better that way, hubs disagrees.

DSCF1050

Kartoffelsuppe

What You Need

  1. 6 large Russet Potatoes
  2. 4 medium Carrots
  3. 2 stalk of Celery
  4. 3 Leeks
  5. Sprig of Parsley
  6. 2 Onions
  7. 4 slices of Bacon (more fat the better)
  8. 2 Tbsp Butter
  9. 3 Tbsp Flour
  10. 8 cups Salted Water
  11. Pinch of Marjoram
  12. Salt and Pepper to taste

What to Do With All That

  1. Slice Potatoes, Carrots, Celery, Leeks, dice Onions and mince Parsley
  2. Add to Salted Water and bring to a slow boil in a large pot
  3. Cook until Potatoes are tender
  4. Chop Bacon into small pieces and fry in large skillet
  5. Add Butter and onion and sauté in skillet until browned
  6. Add Flour to skillet and mix thoroughly, cook over medium heat for 2 minutes
  7. Slowly add 1 cup of liquid from soup pot to skillet, stirring until combined
  8. Add skillet mixture to soup pot
  9. Stir in Marjoram
  10. Simmer for 25 minutes
  11. Puree using an immersion blender
  12. Add water until desired consistency is achieved
  13. Salt and pepper to taste
  14. Bring to a slow boil, then serve

ENJOY!

 
Leave a comment

Posted by on December 16, 2012 in Uncategorized


Tags: , , , , , , , , , , , , ,

Dove Season Jalapeno Poppers & My Favorite Helpers

Since I met my wonderful husband, we have gone dove hunting every year. We usually go alone or with his dad (who I think goes just so we can eat at this one italian restaurant on the way home…), but we have taken all three kids together or separately at least once.

The first time we took Gabs, she was so excited. She wanted to bring her purple feather and sparkle-lined easter basket from earlier that year, and she wanted to bring Harley, our weimaraner. When we asked her why, she said that Daddy was going to shoot the “dubs” and Harley was going to get them and put them in her basket. HA! It was so hot, that Harley would only lounge around or seek out other shade… But she did get a dub in her basket!

DUB!!!!!! Poor Gabby, look at all that sweat…

This year, we took all the kiddos, and, even though it was still blistering hot, they still had a lot of fun.

Loving siblings 🙂

Louie learned lots about hunter safety this year since he actually got to use a gun!

Now, I know my whole family knows we love to hunt, but I thought it was especially sweet of my mom to send me a recipe from Texas Monthly about Jalapeno Dove Poppers, so I made a point of making them with some of the birds.

Poppers and Dove Breasts on the grill!

Dove breasts, jalapenos, cream cheese, pepper, garlic salt, and bacon… Grilled over charcoal and mesquite wood…

These were SO delicious….

They turned out DELICIOUS.

The only thing I would have changed would be to use taco seasoning, or some other combination of seasonings, with the cream cheese – the salt and pepper just weren’t quite flavorful enough for me, but they were still so very tasty that I wished we had more birds to fix up!

We had them with a plain lettuce salad and some watermelon to keep it fairly simple.

Jalapeno Dove Poppers

What You Need

  • whole plucked dove breasts
  • garlic salt (or other seasonings)
  • pepper
  • 16 ounces cream cheese per 15 dove breasts
  • one jalapeno per dove breast, halved
  • One slice of bacon per dove breast (cut in half width-wise)

What to Do With All That

  1. Separate the dove breasts from the breastbones to make 30 lobes.
  2. Sprinkle the lobes with garlic salt and pepper.
  3. Mix in any seasonings you want with the cream cheese.
  4. Take a lobe, some cream cheese, and a jalapeno half, wrap in bacon and secure with a toothpick.
  5. Grill over charcoal and mesquite (or oak or pecan) for 3 to 5 minutes, then turn and continue grilling until bacon is crisp.
  6. Don’t forget to make more than you think your family will want – they will eat more!!!!!!!!

ENJOY!!!

 
Leave a comment

Posted by on November 11, 2012 in Uncategorized


Tags: , , , , , , , , , ,

Delicious Foil Salmon & The Advocare 24-day Challenge

The recipe at the end of this post is my absolute favorite way to fix salmon (besides salmon patties, but those are too sinful to have very often!). I’ve fixed it before, but I was re-inspired to make it while coming up with a meal plan for the 24-day challenge that I just started thanks to my good friend Janel!

Salmon and tomato mixture, ready to be sealed and baked!

Janel and her husband started using Advocare products early this year, and Janel gave me some samples of Spark at a game night. Spark is a mental focus and energy drink mix that works better than a pot of coffee. I was skeptical, so the samples stayed in my purse for a few months completely forgotten (oops). One day at work, I was having trouble keeping my eyes open and focused on the task at hand, so I went digging for some gum. Lo and behold – the spark samples fell out of my purse! I thought “what the hell, why not,” and mixed it up, drank it down and got back to my desk. Within 10-20 minutes, my eyes were open, I was furiously working away, and I felt like I could keep going all afternoon and well into the evening. I used the other 2 samples over the next 2 days, and I was truly amazed. I had plenty of energy, and I was focused like a laser beam!

So… I told the hubs about it, and he asked me to look into the company, the products, and the opportunity. After talking more to Janel, we went to a “mixer” (the dreaded… mixer…). What sold me on giving the challenge a shot was hearing the amazing before and after stories from others as they described losing weight, having more energy, and learning to make better healthy choices all at the same time.

The challenge is broken into 2 parts: Cleanse & Max (or Lean). Besides taking certain supplements, you are supposed to minimize fried foods, dairy, alcohol, refined sugars, white starches, bread, crackers, corn, coffee & soda for the first phase, and minimize alcohol, white starches and dairy during the second phase.

These limits meant that I needed to plan meals out, so I created a spreadsheet (of course)! I had to keep things interesting and tasty since the kids and husband would still be eating the same things, so I went back into my stash of recipes to find ones that met the criteria. The recipe below, adapted from Giada de Laurentiis, was one of them!

3 sealed packets and one open

Salmon Baked in Foil

What You Need:

  • 4 (5 ounces each) salmon fillets, skin removed
  • 2 teaspoons olive oil plus 2 tablespoons
  • Salt and freshly ground black pepper
  • 6 tomatoes, chopped, or 1 (28-ounce) can chopped tomatoes, drained
  • 1 chopped onion
  • 2+ tablespoons fresh lemon juice
  • 1 teaspoon dried oregano
  • 1 teaspoon dried thyme
  • Foil

What to Do With It:

  1. Preheat the oven to 400 degrees F.
  2. Sprinkle salmon with 2 teaspoons olive oil, salt, and pepper.
  3. Stir the tomatoes, onions, 2 tablespoons of oil, lemon juice, oregano, thyme, salt and pepper in a medium bowl to blend.
  4. Make “boats” out of 4 12″ square pieces of foil.
  5. Spoon half of the tomato mixture evenly on the boats.
  6. Place a salmon fillet on top.
  7. Spoon the rest of the mixture on top of the salmon.
  8. Fold the sides of the foil over the fish and tomato mixture, covering completely; seal the packets closed.
  9. Place the foil packets on a heavy large baking sheet.
  10. Bake until the salmon is just cooked through, about 25 minutes.
  11. Using a large metal spatula, transfer the foil packets to plates and serve.

Enjoy with brown rice for a yummy, healthy, advocare 24-day challenge friendly meal!!

Serve with brown rice – yum!!

 
Leave a comment

Posted by on August 31, 2012 in Uncategorized


Tags: , , , , , , ,

Summer Corn Soup (vegan!)

Summer Corn Soup (vegan!)

Side note before I get to the main topic – I just noticed that ALL of my posts so far have something in parenthesis in the title… Interesting…

So I’ve made a few fantastic dishes lately, but I wanted to blog about this one for my wonderful Sea Star – who is vegetarian – so she can take advantage of it while corn is C-H-E-A-P. Her boyfriend is vegan, so this works for him too, but it’s for her – most certainly. 🙂

This dish uses every part of the corn, and after you strain the broth, you can still put the husks and silks into the compost!

I made this Corn Soup for game night, served chilled, and it was pretty good. I would like to try it hot also, I think it would really be delicious.

Gabby had to help me, of course…

The Princess needed to have her picture taken after helping me make the salsa…

The kids all love to help me cook and clean – I know that will not last for forever, so I take advantage of it now and let them help any way they can!

Two tools I recommend for this recipe:

An immersion blender – I LOVE mine. Especially when I am making something hot that needs to be pureed (like this soup, or tomato/red pepper soup), it’s so much easier than transferring to a blender, pureeing and then transferring back…

The Vidalia Chop Wizard – This LOOKS gimmicky, but I swear it’s worth it! It chops, contains, measures and keeps you from crying.

This recipe is adapted from http://17bites.wordpress.com

Corn Broth

What You Need:

  • 8 ears of corn
  • 12 cups water

What to Do With All That:

  1. Shuck the corn, placing all of the husks and silks into a stock pot.
  2. Cover with 12 cups of water.
  3. Bring to a boil.
  4. Reduce to medium-low heat and simmer for about an hour.
  5. Strain the broth and freeze any extra for future use!

Looks interesting… This is the strained corn broth. I froze a whole bunch.

Summer Corn Soup

What You Need:

  • 1 1/2 cups corn broth (don’t skip this and use veggie broth – the corn broth really MAKES this soup!)
  • 8 ears corn
  • Dried parsley
  • Butter (or olive oil)
  • salt & pepper
  • 2+ cloves garlic, crushed
  • 1 onion sliced
  • olive oil
  • 1 red onion, diced
  • cilantro
  • 1 lime
  • 1 avocado
  • 1 jalapeno, diced

What to Do With All That:

  1. Preheat oven to 400 degrees. Arrange your 8 ears of corn on a cookie sheet. Top with butter or olive oil, dried parsley, salt and pepper. Cover with foil, and roast for 20 minutes.
  2. While that is cooling, saute garlic and onion in olive oil for about five minutes.
  3. Cut the corn off of the cobs, splitting 3 and 5 groups out for different uses:
  4. Add the group of corn kernels from the 5 cobs to the garlic and onion, puree with an immersion blender.
  5. Add 1 1/2-2 cups corn broth (depending on how thick you like your soup) and heat gently for about 5 minutes.
  6. To top your soup: in a bowl, mix the remaining roasted corn (from the group of 3), a tablespoon of olive oil, a few tablespoons of finely chopped red onion, two tablespoons chopped cilantro, the juice of one lime, chopped avocado, and diced jalapeno. Mix.

Summer Corn Soup topped with Corn Salsa

Enjoy!

 
Leave a comment

Posted by on August 7, 2012 in Uncategorized


Tags: , , , , , , , ,

Chocolate Cupcakes with Oreo Cream Cheese Frosting (yummmmmmmm!)

Chocolate Cupcakes with Oreo Cream Cheese Frosting (yummmmmmmm!)

From mid-June to mid-July, I was sick. Not sure with what, but my throat was sore, I had a fever, the chills, I was all achy, I had migraines and I was extremely tired all the time. I had several deadlines at work, so I waited until Saturday and went to CareNow (my first mistake), where they did a strep and mono test which both came back negative, and they diagnosed me with…. wait for it….

A sore freaking throat. Wow.

They gave me an antibiotic and sent me on my way. By Tuesday, I still wasn’t better, so I called them (second mistake) and they called in a prescription for a mixture of Lidocaine and Benadryl that some call Magic Mouthwash. It was terrible – my throat would be numb for 30 minutes and it was so hard to swallow that it just wasn’t worth it.

On Saturday it was still so bad that I went back in to CareNow (third mistake), where they did more tests – all of which came back normal – and prescribed a different antibiotic and some steroids. The steroids made everything better except the fatigue. Until Thursday, when all the other symptoms returned. But I had another deadline, so I waited… And went to CareNow on Saturday. Again. (fourth mistake) More tests, different antibiotics and more steroids. Same results. Except that my white count came back at 21,000 – way above what it should be. So I went back the next day, my white count was lower (17,000) and the steroids again made me feel better, but still tired.

Adding the oreos to the mix.

Finally I went to my GP on Tuesday (3 weeks later), where he said to NEVER go back to CareNow again and gave me his card with his cell phone number (HA). I was told that because of everything that I had been on so far that any tests would be inaccurate, so he treated me on the symptoms alone. One more different antibiotic (supposedly a really strong one), and by Thursday I was feeling about 50% better – without any steroids so I could tell it was working (genius).

I was so tired of being in bed that as soon as I started feeling better I got out of bed and started cleaning a little and then decided it was past time to cook again!!!! The kids and the hubs had been surviving on pizza, tacos and wings for a month… Enter the subject of this post!

These were a HUGE hit both at home and at work. Lots of complements on the icing!

The cupcakes were OK. I think I would use one of my other chocolate cupcake recipes next time, but if you don’t have a favorite recipe, this one works just fine. The frosting MADE these cupcakes DELICIOUS! I took them to work and they were gone within about an hour of me sending an email blast that there were some in the kitchen. Lots of compliments were given – from family and from coworkers.

Hershey’s “Perfectly Chocolate” Cupcakes (from the back of the cocoa box)

What You Need:

  • 2 cups sugar
  • 1 3/4 cups all purpose flour
  • 3/4 cup Hershey’s Cocoa
  • 1 1/2 teaspoons baking powder
  • 1 1/2 teaspoons baking soda
  • 1 teaspoon salt
  • 2 eggs
  • 1 cup milk
  • 1/2 cup vegetable oil
  • 2 teaspoons vanilla extract
  • 1 cup boiling water

What to Do With It:

  1. Stir together sugar, flour, cocoa, baking powder, baking soda and salt in large bowl.
  2. Add eggs, milk, oil and vanilla; beat on medium speed for 2 minutes.
  3. Stir in boiling water (batter will be thin).
  4. Fill cups 2/3 full with batter.
  5. Bake 22 to 25 minutes.
  6. Cool completely before frosting.

Makes about 24-30 cupcakes.

Oreo Cream Cheese Frosting (THIS IS “DA BOMB”)

What You Need:

  • 2 8 oz packages of cream cheese, room temperature
  • 1/2 C butter, room temperature
  • 6-8 C powdered sugar (use more or less depending on how stiff you want the frosting to be)
  • 1 t vanilla extract
  • 2+ C crushed Oreos (more or less depending on how Oreo-y you want the frosting…)

What to Do With It:

  1. Using a stand mixer (or hand mixer) whip cream cheese and butter together until light and fluffy.
  2. Stir in powdered sugar two cups at a time.
  3. Add vanilla extract and mix.
  4. Stir in crushed Oreos.

Enjoy!!

 
3 Comments

Posted by on July 28, 2012 in Uncategorized


Tags: , , , , , , , ,

Grilled or Roasted Corn – Wrapped in Bacon (of course!!!)

Grilled or Roasted Corn – Wrapped in Bacon (of course!!!)

I have a hard time finding fault with things wrapped in bacon. So when this recipe came to my inbox in my Food.com newsletter, I was more than ready to try it out.

The notes from the recipe say that it is adapted from one of Paula Deen’s recipes, which are typically hit and miss with me. Sometimes they come out so wonderful and tasting like the best thing I ever ate, sometimes a recipe will completely tank and taste like crap in a pan covered in butter, and a lot of her recipes take FOREVER to make. So knowing that it was from her, I read it over carefully and made some changes that I thought would help.

The end result was a very, very tasty side of corn where the kernels practically jump off of the cob and onto your taste buds. We ate the corn with Reuben and Cuban paninis (I forgot the bacon on the Cuban, but it was ok because there was some on the corn!!! At least, that’s what I told myself…).

While Louis went to pick up the boys, Gabby and I got started on dinner. She’s such a cute little sous chef!!!

She’s peeling the silks off of the corn and putting them into the compost bucket.

She did complain a little that her hands were tired of working on the corn, but that was just because she could smell the bacon and was a little impatient.

She really does like to help!! She even swept up the stray scraps when we were done. – voluntarily!

Here are the changes that I made, also noted in the recipe below:

The original recipe says to soak the corn for 30 minutes, but I just soaked the first ears as long as it took to peel the husks back, remove the silks and then cook the bacon a bit, then I pulled the bottom ones out first to wrap the bacon around and tie off before getting the next one out of the water. I thought the bacon wouldn’t get crisp being wrapped in the husks, so I cooked it about halfway in our cast iron skillet before putting it on the corn. After you wrap the bacon around the corn, get one side of the husks pulled up and then drizzle some of the pan drippings on the corn, then finish wrapping it up and tie it all together. I also didn’t pat the water off of each one as I pulled them out.

I think the changes really had a big impact, but if you want to try it as written, let me know how it turns out!

Bacon Wrapped Grilled (or Roasted) Corn on the Cob

What You Need:

  • 8 ears corn
  • 1 lb bacon
  • water, for soaking
  • butcher string

What to Do With It:

  1. Carefully expose the corn kernels by pulling back the husk, but do NOT remove the husk.
  2. Remove the corn silk – you can use a soft brush to ensure that all the silk is removed. (I had Gabby help with this, and she seemed to have fun with it – we also still had some silks left on the final product and no one seemed to notice.)
  3. Put water in a large container, add the corn, and soak the corn in the husks for 30 minutes. This will help to prevent the husks from charring on the grill. (I soaked the first one for as long as it took to do the rest and cook the bacon a bit, then used the first one first to wrap & tie)
  4. (This is a step that I added: while you are de-silking the corn, cook the bacon about halfway – don’t make it crispy, but it should be just about there – remove from the pan and set aside)
  5. Preheat grill to medium temperature. (or turn on the broiler)
  6. Remove the soaked corn from the water and pat dry. (I skipped this step)
  7. Wrap strips of bacon around the corn kernels on each ear; fold the husks back over the bacon and kernels. (before I folded all of the husks back, I drizzled some of the drippings from the pan, I don’t think the corn would have had as much of a bacon taste without this step.)
  8. Tie the husks down with butcher string; repeat with all ears of corn. (I did this as I wrapped them with bacon and pulled the husks back up)
  9. Grill over medium coals/heat, turning occasionally, for about 15 to 20 minutes and until the bacon is cooked and the corn is tender. (I put it all in the broiler for 20 minutes)
  10. Cut the butcher string away from the husks and serve.

Enjoy!

 
1 Comment

Posted by on July 21, 2012 in Uncategorized


Tags: , , , , , , ,

Oreo Stuffed Chocolate Chip Cookies (did you drool as you read that?)

 +  = 

I went on sugar overload when I first heard of these cookies – just from reading the name… So I never could convince myself to make them until the other night.

Once a month, we have a game night with several of our other friends and their wives/husbands/significant others, etc. We rotate host houses, the host provides the main course, and everyone else brings a side dish and their own beverages. This time it was at Janel and Scott’s. She said she would be making Buffalo Chicken Garbage Bread (I was skeptical, but it was absolutely delicious), Barbara was bringing salad, and I offered to bring a dessert.

Enter THE cookies…

This recipe is from Lick The Bowl Good’s blog, which is very dangerous to follow – you have been warned!!  http://www.lickthebowlgood.blogspot.com/

I might use my own chocolate chip cookie recipe next time, this one had a lot more flour, less butter and sugar and just wasn’t quite the same as I’m used to – but the overall cookie turned out really tasty!

The dough ball that winds up on the cookie sheet is literally the size of a tennis ball! Check out the blog above for more details…

Oreo Stuffed Chocolate Chip Cookies

What You Need:

  • 1 cup butter, softened
  • 3/4 cup light brown sugar, packed
  • 1 cup granulated sugar
  • 2 large eggs
  • 1 Tablespoon pure vanilla
  • 3 1/2 cups all purpose flour
  • 1 teaspoon salt
  • 1 teaspoon baking soda
  • 10 oz bag chocolate chips
  • 1 package Oreo Cookies (not all will be used)

What to Do With All That:

  1. Preheat oven to 350 degrees F.
  2. In a stand or electric mixer cream butter and sugars until well combined. Add in eggs and vanilla until well combined.
  3. In a separate bowl mix the flour, salt and baking soda. Slowly add to wet ingredients along with chocolate chips until just combined.
  4. Using a cookie scoop take one scoop of cookie dough and place on top of an Oreo Cookie. Take another scoop of dough and place on bottom of Oreo Cookie.
  5. Seal edges together by pressing and cupping in hand until Oreo Cookie is enclosed with dough.
  6. Place onto a parchment or silpat lined baking sheet and bake cookies 9-13 minutes or until cookies are baked to your liking. Let cool for 5 minutes before transferring to cooling rack.

Makes approximately 20-24 very large cookies

 
4 Comments

Posted by on June 25, 2012 in Uncategorized


Tags: , , , , , ,

Creamy Avocado and White Bean Wrap – Vegetarian! (could even be vegan!)

This post goes out to my lovely youngest sea star – Erin. Much love to you!

I love meat. Steak, ground beef, chicken, pork, shrimp, fish, eggs, BACON – all super good! To my husband, each one is a separate food group – he LOVES meat. Ha. I don’t love it as much as he does, so I don’t always want to have it be the key feature of a meal.

One of my coworkers asked me a couple of weeks ago if i would be interested in grocery shopping with her for lunches for the work week. I jumped at the chance – easier on the budget AND easier on the diet! The first week, we went to the store without a list (BAD IDEA) we wound up with stuff to make sandwiches, salads and a really good spinach pizza. After that, we decided that it might be a good idea to alternate shopping/cooking weeks and have one person buy groceries and cook one thing at home to bring for one meal, then the next week the other person does the same.

This week fell to me to plan, shop and cook for. While searching my own soul for ideas of cheap, easy lunches that didn’t involve 2 slices of bread and some peppered turkey, I came across a great resource in eatingwell.com. I perused their recipes for a while, did some searching for something summery that didn’t need to be heated and wasn’t heavy, and found a recipe for a Creamy Avocado & White Bean Wrap.

I adapted it a bit, and I have to say, the name doesn’t include anything about the slaw, but that is by far the ROCK STAR of this recipe! I would suggest making twice the slaw and eating it as a side to other things… This recipe is vegetarian and could be made vegan if you leave out the cheese. Make sure to cook your own beans too! It’s cheaper than canned, plus you know exactly what went into those puppies (no lard for veg heads).

Creamy Avocado & White Bean Wrap (AND FREAKIN AWESOME SLAW!!!)

What You Need:

  • 2 tablespoons cider vinegar
  • 1 tablespoon canola oil
  • 2-3 finely chopped canned chipotle chiles in adobo sauce (from the Mexican aisle of the grocery store, use more for spicier slaw, less for mild – but who would want mild slaw???)
  • 1/4 teaspoon salt
  • 2 cups shredded red cabbage
  • 2 medium carrots, shredded
  • 1/4 cup chopped fresh cilantro
  • 1 15-ounce can white beans, rinsed (or use dried and cook after soaking)
  • 1 ripe avocado
  • 1/2 cup shredded sharp Cheddar cheese
  • 2 tablespoons chopped red onion
  • 4 wraps or tortillas

What to Do With All That:

  1. Whisk vinegar, oil, chipotle chile and salt in a medium bowl. Add cabbage, carrot and cilantro; toss to combine.
  2. Combine beans, avocado, cheese and onion in food processor, pulse until smooth-ish.
  3. To assemble the wraps, spread about 1/2 cup of the bean-avocado mixture onto a wrap (or tortilla) and top with about 2/3 cup of the cabbage-carrot slaw. Roll up. Repeat with remaining ingredients. Cut the wraps in half to serve, if desired,

Have this with a beer!!!!! My coworker added peppered turkey to hers, I tried it that way and it’s good, but this is fantastic without meat as well.

Enjoy!

 
Leave a comment

Posted by on June 12, 2012 in Uncategorized


Tags: , , , , , , , , ,

Tasty Chicken that Needs No Babysitting (or marinating)

You may be noticing a pattern… I like to cook!

But I don’t like to cook things that just so-so, or things that take a whole lot of effort. Especially when it’s Tuesday and our turn to play host for Bible study night (every other week it’s here, then at grandma and grandpa’s the next week). I work until 5 during the week, and I’m not usually home until 6:15.

This week, I didn’t go to the store on Sunday or Monday, but I knew we had chicken drumsticks at home that we got for $.99/lb the week before at Kroger. And I knew that corn was on sale for 4/$1. I looked for chicken recipes, but almost everything I found was going to take an hour to make or required overnight marinating or something like that.

I dislike marinating things. It takes time and too much forethought, plus everything is really slimy when it goes in the bag raw, and even more slimy when it comes out of the bag covered in marinating gunk. Not to mention that

“ain’t nobody got time fo dat!…”

(have you SEEN this newscast video with this quote in it? it’s HILARIOUS!) http://www.youtube.com/watch?v=JaAd8OuwwPk

Then I found a recipe that said it would only take 35 minutes. I asked the hubs to go to the store to get a few things I knew we wouldn’t have on hand, and then realized that it wasn’t drumsticks that we bought, but thighs… So I adapted it a bit and the result was a meal that made my Husband say

“Everyone stop eating, this is terrible… I’ll eat yours so you don’t have to suffer!”

The fact that it was a hit made it enough to post here, but the fact that it really took very close to 35 minutes on a weeknight AND was so tasty made it a must-share!

Here are the 3 things we had – enjoy!

Lemon Garlic Chicken (no babysitting!)
You Need:

  • 2 tablespoons extra-virgin olive oil
  • 8-10 skin-on, bone-in chicken thighs (about 3 pounds)
  • salt and freshly ground pepper
  • 2 tablespoons all-purpose flour
  • 12 cloves garlic (about 1 head)
  • 2 lemons (finely grated zest of one, juice of both)

What to do with all that:

  1. Preheat the oven to 450 degrees F.
  2. Heat the olive oil in a large ovenproof skillet over medium-high heat.
  3. Sprinkle the chicken with 1/2 teaspoon each salt and pepper, and 2 tablespoons flour.
  4. Add to the skillet and cook, turning, until slightly golden on all sides, about 5 minutes.
  5. Add the garlic, lemon zest and lemon juice and turn the chicken to coat.
  6. Transfer the skillet to the oven;
  7. Roast until the chicken is golden brown and cooked through, about 20 minutes.
  8. Divvy up the chicken and drizzle with the pan juices. Serve with roasted corn, a salad and some iced tea!

Roasted Corn on the Cob (no shucking required)
You Need:

  • Corn on the Cob (as many as you will eat)

What to Do:

  1. Toss it into the oven with the chicken from the recipe above.
  2. Take it out when you take out the chicken, and let everyone peel it themselves at the table!

Salad (easy peasy)

You Need:

  • Bag of romaine or iceberg lettuce (as much as you want)
  • Cucumber
  • Tomato
  • Salad Dressing

What to Do:

  1. Open the bag and spill the lettuce into a bowl.
  2. Peel and slice cuke(s)
  3. Slice tomatoes
  4. Let everyone pick their dressing and dress their salads.
 
Leave a comment

Posted by on June 1, 2012 in Uncategorized


Tags: , , , , , , , , ,

The Best Steak I Ever Ate (and how you can eat it too)

2 nights ago, I ate the best steak that has ever crossed my lips.

I love me some steak. Medium rare, filet, horseradish crust… yes please! A good steak should NOT need any steak sauce, or anything else (even the horseradish crust) IMHO.

We eat steak a lot at our house, because my husband and kiddos also really like beef, and it’s almost always a very good experience. Hubs has the grilling part down, and they always land on the plate nicely cooked and still juicy – crispy on the outside, soft in the middle.

But he really outdid himself on Saturday!

We typically use ribeye if we can get it cheap enough, or any other meat that’s cheap enough… This time I splurged on the cut and bought boneless ribeye steaks with a really nice strip of fat on the outside of each one, even though they weren’t on sale.

I didn’t know if we needed charcoal or lighter fluid, so while I was waiting to find out for sure, I went to the charcoal aisle and grabbed both along with some mesquite wood chips. I also got stuff to make roasted vegetables (below), and Hubs suggested adding some of the squash from our garden. The other key addition to the cooking process (aside from the wood chips) was a couple of sprigs of rosemary. Here’s what we did to make the


BEST STEAK EVER

You need:

  • 4 Ribeye (or other cut) steaks – these can be bone in or boneless
  • Worcestershire Sauce
  • Montreal Steak Seasoning
  • Charcoal
  • Lighterfluid
  • Lighter
  • Mesquite Wood Chips
  • 2 Sprigs of Rosemary

What to do with all that:

  1. Adjust rack on grill to grilling level (we have one level for smoking, one for grilling)
  2. Add charcoal, lighter fluid, and light it up
  3. Put steaks into a shallow dish and pierce all over with a fork
  4. Sprinkle Worcestershire sauce and steak seasoning over one side, then flip and do the same to the other side
  5. Once the coals turn white, shake some of the wood chips over the coals (don’t soak the chips first), just enough to make a very thin layer over the coals
  6. Once these catch, add the sprigs of rosemary to the fire and immediately put the steaks on the grill
  7. Cover right away for about 5 minutes
  8. Uncover and cook about 2 minutes, then flip them and cook until they are done to your liking (poke them with a fork, if it is squishy it’s rare, soft and yielding it’s medium rare, firm but still giving it’s medium, and firm and not giving is well done – don’t do that to yourself… don’t cook it over medium rare!)
  9. Remove from grill and let rest for about 5 minutes
  10. Enjoy!!

The result is a smoky, sweet, juicy, delicious hunk of meat that will make your mouth water 2 days later when you think about it and describe it in a blog… YUM

To go with this amazing steak, I made veggies:

ROASTED VEGETABLES
You Need:

  • 2 lbs red potatoes
  • 2 onions
  • 2 heads garlic
  • 2 summer squash
  • 6 tbs olive oil
  • 2 tsp salt
  • 2 tsp pepper
  • 2 tsp dill
  • 1 tsp thyme
  • 1/2 tsp basil
  • 2 ziploc bags
  • foil

What to do with all that:

  1. Preheat oven to 400 degrees (425 if you like the charred taste on your veggies!)
  2. Cut the potatoes and squash into cubes
  3. Cut the Onions into quarters, then halve those
  4. Peel the heads of garlic (use the two metal bowls trick if you want this to be quick…)
  5. Mince about 1/4 of the peeled garlic
  6. Add all of this to 2 ziploc bags and pour in 3 tbs oil into each bag
  7. Put half the spices into each bag, seal and shake it up
  8. Line 2 cookie trays with foil and spray with cooking spray
  9. Pour 1 bag onto each cookie sheet and put into the oven
  10. Bake for about 35-45 minutes, stirring once or twice

Eat these with the PERFECT steak as described above, and ENJOY!

 
2 Comments

Posted by on May 28, 2012 in Uncategorized


Tags: , , , , , ,

 
Littlest Martha

petite woman with big aspirations

Luv Dat Cupcake

the sweeter side of life

power4the24

A fine WordPress.com site

everyday theology

we cannot escape the presence and goodness of God

24daychallengerecipes

Tasty recipes for Advocare's 24 Day Challenge

Loving Life at Home

Marriage, Motherhood, and Minding what Matters Most

Immeasurable Hunger

a young woman's ravenous exploration of food and life

17 Bites

I've been told that's how many it takes...